Monday, April 23, 2012

Making a wig for your baby doll from Fake fur


This is for those of you that make baby dolls or even art dolls.  The instructions will work on any doll and any fur with hair on it.  


To begin with you will need the doll head pattern.  I am using Judi Ward's "Prince William" pattern to make this wig from.

You can see that I have the face pattern piece and have taken a section from it from just above the brow and run it back to the back of the head.  I traced this onto freezer paper so that it will be the same size as the dolls head.


As you can see the piece fits the original doll head-face pattern.
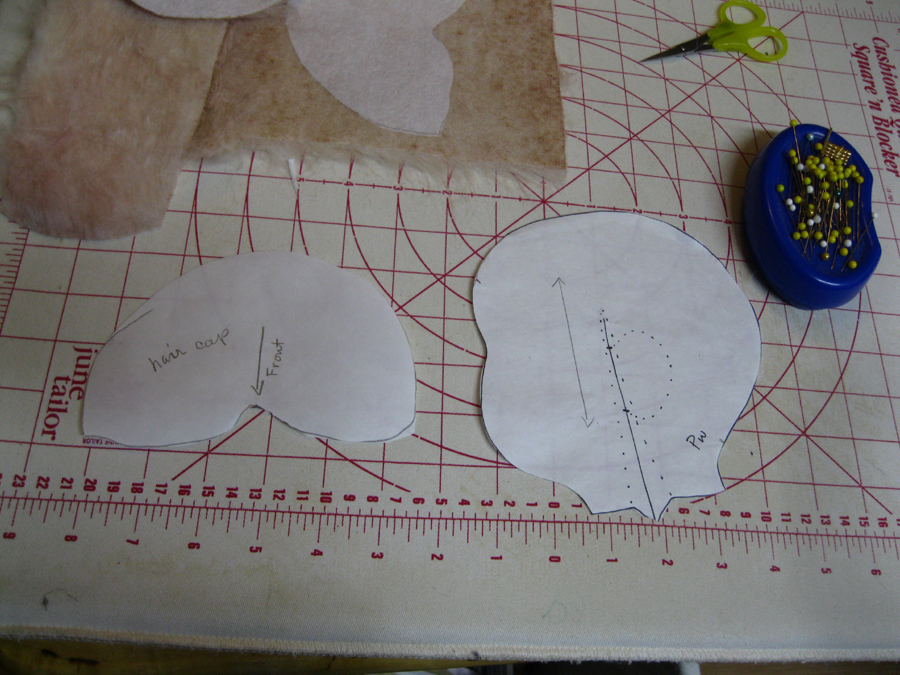

Next I trace out a side piece the same size of the doll head. I  made a upside-down U shape over the ear as it was marked on the original patter.


I made this to fit the head for a short hair cut as this is a baby doll.  If you want adult hair bring it to the nape of the neck.


At this point I have cut the new pattern out of iron-on inner facing fabric and I ironed that to the fake fur.  This fur was hand dyed with Ritz liquid dye. ( red-yellow-tan )  Now it is cut out close to the weave of the fake fur.  Be careful to only cut the knit of the fabric and not the hair part.  When cutting the piece make sure that you mark the front of the face piece so that you can iron it to the fabric that has the length when cut extended past the knit.  The sides are cut with the ear considered the long side.  When cutting any knit the facing will avoid the problems of the stretch of the fabric.


Once the 3 pieces are cut out you begin pinning them together.  Always make sure all the fur is tucked in the seam.  I make the seam just under the original seam of the doll head so it cam be slipped onto the head when it is sewn.  I also mark the front of the piece this makes matching the right sides together to the center piece.


One side has a F in the front and the other has a B in the back of the head for the wig.


Now you are ready to sew it.  The shape of the wig is all in how you design it for each doll.


Have fun with your new doll wig.


Sunday, April 22, 2012

Needle Sculpted flat faced doll

Supplies:
     double stretch fabric (doe swede) 
     acrylic paints
     iron-on interfacing
     small pompoms
     med pompom
     batting


When making a baby doll or any flat faced doll I have always had a problem with the flat face.  I have discovered how to have a needle sculpted face on a flat faced doll.


Here we have the beginnings of a flat faced doll.  Some call this a baseball head.


What I have done is to take 2 small pompoms and a med. pompom and glue them together in the shape of a natural nose.  Then I placed batting above this and glued these to the back side of the face fabric.  Note: I use fabric glue for this and very little of that.


When you turn the fabric back over to the right side note where the nose is aligned.  I glued it so that I could roll it up or down while needle sculpting the face once it is put together and stuffed.  As you can see I also painted the basics of the face while it was flat.  This makes painting the face much easier.


At this point I place iron-on interfacing on the back side of the face piece.  This will stabilize the face as well as allow you to sculpt the nose without loosing the shape in the overall stuffing of the head.


Iron facing to back of face allowing the area for the nose to be free from adhering to the lining.  I iron 1" out from the pompoms and batting.


I use hot iron and press not iron the facing onto the face.


Press the facing to the side pieces before sewing them together.  The facing will be offset a bit when ironed on so I trim it to the shape of the face piece.


Now the head is ready to sew together and stuff.  


Friday, March 09, 2012

Hexagons, Diamonds and the Y seam


Managing those nasty Y seams can be much easier than they may seem. The follow is a good way to master it. I created this pattern just to show how it can be done. The pattern is called Hexagon Star


Step 1:

I would like to take the ouch out of those nasty Y seams.

To begin with you sew the two diamonds together on the side seams, leaving 1/4" at the beginning and end of your seam. Then press the seam to one side.

Always press seams in same direction at this time.

Image #1


Step 2

Next step is to connect the hexagon to the 2 diamond pieces. I always use a quilting pencil and mark the 1/4" seam on the hexagon and diamonds. This helps you begin and end the seams in the right spot. This takes more time but will be much better in the long run.

Sew across the bottom of the first diamond piece.


Image #2


Step 3

Now we begin a Y seam. Now sew across the bottom of the 2nd diamond piece.

This is where you press the pieces in one direction to form a 3 sided center. When you press the seams in one direction it should fall open as in image #3.

Continue sewing Diamonds onto the hexagon until you have reached the first diamond. Sew that last diamond to the first one.


Image #4


Step 4

Adding the triangles. This is where the true Y seam comes in.

Again mark all pieces at the 1/4" seam to help locate where to begin and end your seams.


Image #5


Step 5

Begin at the inside point and sew to the outside in both directions making sure you are leaving that 1/4" before sewing. Press flat and you will see that same 3 sided center lay in place.

Because you are sewing on the bias you will have some give as you sew. If you sew from the inside out you can fudge a bit to make that point.

Image #6


Step 6

Go ahead and have fun mastering the Y seam with Hexagons and Diamonds.


Contact me for pattern if you want it.
$ 5.00


This is a crib size quilt.

Monday, July 04, 2011


I have been working on a necklace for Betty. This is a fringe beaded necklace. I have been looking for a nice distraction that was limited in space for the supplies and love making jewelry so picked it back up. When I was very young in the 1970s I made quite a bit of it. I have now discovered the wonderful new creations by others and several nice books.

Friday, June 03, 2011

Priscilla


Marice


Maurice in the making. I was challenged to create a doll from a little known movie called "The Triplets of Bellville" and Maurice came out. And He was such fun. Standing at 35" he is fun.

Butterlfy quilt top


This is a quilt top made from my butterfly designs that can be purchased at http://ww.victorianbathdelights.com under Embroidery Work. There are 16 designs and I loved doing then in black and white.

Beaded Collar


My current project in beading. My dear friend Maxi made 2 of these and I so enjoyed them that I just had to try to make one. It has taken me a long time to get to this point and hope to complete it this summer.

Saturday, June 09, 2007

Saroyia


This is a mermaid I designed she stands 28" tall.

Cat


This is my cat again in another piece.

This elephant piece was fun to work on. It is framed by wrapping it around a canvas frame.

I so love to play with fiber arts.

Tranquil Egrit


This is a piece I just finished and had framed.

MF Machine Felting a Giraffe


I have been working on this project for some time.

The watercolor I did in 1978.


The background is handpainted and 60" X 64"


When combined they are very impressive.

My next step is to machine quilt it for the show in May 2008.

ME quilt block


I know that I have not been on here in some time but I do stay very busy. The newist thing is a class in quilting with the Embroidery Machine. I thought I would add this to my blog for those who would like to see the process.

First of all I went into Illustrator and created a design to digitize in the software that I have for machine embroidery (ME)

After it is digitized and I stitch it this is the first step in making the block. I stitch the complete design in a contrasting color onto muslin so to help me in placing the different pieces.

*** The supplies for this project are as follows:

The first step is to assemble your fabrics and press them.

For each block you will need the following cuts:
1 = Triangle 2.5" (take a 3" square and cut in half for triangle)

2 = 2.5 " by 3.5" strip
3 = Triangle 2.5"
4 = 6.5" by 1.75 " strip

5 = 2.5" by 4.5" Triangle

6 = 8" square of muslin or stabilizer


Set the muslin and stabilizer into your 4" hoop and stitch all the areas on the design for a base for laying up your patches usinga contrasting thread. It should look like below without the
numbers.

Placement of each part is very important. The #1 triangle is positioned just so. Make sure you have a .25" seam then place the #2 into position as in the next photo. Always press the seams to set them then fold the fabric over and press then into position before working the next stitch.


Place #3 the second triangle on the #2 piece and let the machine stitch it into place.


This process is continued throught the block until you get to the last stitching that will put in the inner stitch to hold everything into position. I do not use the contrasting thread after the basic outline.

This is all done in the hoop and designed for a 4" hoop.


Trim the block to .25" outside the box so you can

put the pieces together into a quilt.


Enjoy the fun.

This pes file can be purchased from me for $3.00 at www.victorianbathdelights or by e-mailing me for instructions on how

to get the design.


Friday, December 22, 2006

Here it is another year close on our heels. Merry Christmas to one and all and I hope that all of you have a very Happy New Year in 2007.

I will try harder to put info into this blog next year. I am trying to do more journaling and keeping a record of what I do so that others can see the things I am up to as well as give hints and tips for those of you who want to do some of the same things I am doing.

If I forget and have not noted on this site in a while please feel free to note me to remind me to take the time to send you a note here. I get so busy learning new things that I loose track of time.

Ginger

Sunday, November 26, 2006

It is late November where has the time gone?

I just looked up and the year is almost over. I get so involved in making dolls and things that I loose track of time. My year has been very busy. I hope to focus on one theme this coming year. “At the Beach” I travel there often and love all the peace at the ocean’s edge. I have begun by designing 2 dolls that are Beach related and sketched a couple of places I love to visit. I need to prepare several pieces for a show in the Spring of 2008 and thought that a theme might get me started in the right direction.

Several wall hangings are finished and I have 3 dolls I feel might fit the bill. With dabbling in Fabric Postcards and other fiber arts I hope to have 50 pieces for the show.

I grew up with a very talented Mother who loved crafts and was a great artist as well. My Father also was an artist in his own way so I have come by the passion naturally. The first big thing I remember doing was when I was 9 and Mother let me draw on one wall of my bedroom. Like all crazy people I went big. I mean really big. I graphed off the entire wall and proceeded to draw the last supper in life size on the wall. This was a help to Mother as it kept me very busy for quite some time.

I paint anything that isn’t nailed down and many things that are. Painting from fabric to stone is a passion. I use watercolor, oils, acrylics, various inks and stains on all sorts of materials that they were not meant to be used on. I also sew most anything. Basically if I have seen it and liked it I could recreate it. I hate to try and create something on demand. If it comes out I will work with it but I am not good at taking orders.

There are several places where a person can see they work I do and I will list them here so that those reading this can look if they like.

http://www.victorianbathdelights.com/

http://gingersdolls.blogspot.com/

http://www.picturetrail.com/glxmas

http://www.ancestraltracks.com/

http://groups.yahoo.com/group/dollssocool/

These are my favorites as they are my pages. My husband Cliff is so good at working on the web page design for me that I just play and he puts things up online.

Sunday, September 03, 2006

Another Week Gone

I have played away another week here at home and most of it was running around to setup classes for the Fall at the local shops. Here is the lineup:

Sept 5th 2006 Polymer Clay Buttons and Mold making at A Common Thread qult shop 1:30 - 4:30

Sept 8th 2006 I am taking a class at Creative Fabrics in Wheeler on the Easy Elegant Lone Star and will post the photos later.

Sept 16th and 23rd I am taking a doll making class with Patti LaValley in St. Helens.

Sept 24th and October 14th I will be teaching Cross stitching with beads at Bodacious Beads in Reedville 12:30 to 3:00

Sept 30thand Nov 9th I am teaching again at Bodacious beads this time it will be beaded doll face pins from 10:00 to 1:30

October 21st I am teaching Polymer Clay at the Reigning Dolls and Bears Doll Club in St. Helens 5:30 to 8:00

October 26th Hillsboro Vac N Sew I am teaching the machine embroidery spiritdoll in a hoop.

October 28th will be Vac N Sew again for the 20" dolly in a hoop for machine embroidery people.

Nov. 18th Vac N Sew class on Spiritdoll in a Hoop 10:00 12:00

Feb. 15th 2007 MEOW The Mouse Connection I am teaching 3D machine embroidery

That should keep me out of trouble for a while.

I have designed Dottie which is a machine embroidery doll that can be made into a doll or used as a stand alone embroidery design for quilt blocks or just embellishments. Dottie is in 17 different outfits and I have hopes to design accessories for her like purse or even cat or dog for her to have along.

I made 2 Canarby Cat dolls for an exchange and 1 polymer clay face for another exchange. I really love making things to send away because this house is getting full of my play things :o)

I managed to get the last of 10 charity quilts quilted and put together a quilt "French Braid" and have it ready to quilt when I get back from vacation.

Along with all that I am getting the motor home ready for a week of fun and play.

My intention when I first set this up was to try to journal my activities but they are so much fun that I am too tired to type when it gets to be 10:00 pm or so and I just goto bed. I wake up at 5 everyday.